Monday, May 30, 2011

Change system folders to a desired location

  • Just a thought: Imagine if you were to clean-install the OS - You need to copy all your data in the OS partition(Desktop/My documents, etc.) to another partition/drive. If you could store data by default in another partition, it will save you the effort and time.
  • Recommendation: Dedicate a partition completely to the OS and store data in another partition.
  • Advantages:
    • You don't need a spare drive to copy data in case you want to clean-install the OS.
    • After reinstall, your PC looks pretty much the same.
    • Your Desktop looks the same when you dual-boot to another OS (Customizations may be required in the other OS).
  • Which folders are we talking about:
    1. Desktop
    2. My Documents, Music, Pics ...
  • Initial steps:
    1. Choose the partition under which you want to store files from now on.
    2. Create a folder named "WindowsFolder" - This will be the folder under which everything will be stored.
    3. Create sub-folders "Desktop", "My documents" etc. 
Note: If your PC has only one partition, you could use any partition software to create another partition. I recommend Partition wizard (Home edition). It's free and easy to use too.
  • On Windows XP:
    1. Download and install "Tweak UI".
    2. Cut and paste all files from the Desktop into the folder that you are going to use as your Desktop folder ("WindowsFolder\Desktop").
    3. Launch "Tweak UI".
    4. On Tweak UI, navigate to My Computer->Special folders.
    5. Choose "Desktop" from the drop down list and click "Change location".
    6. Select the new folder ("~\WindowsFolder\Desktop") and click Apply.
    7. Go to the Desktop and press F5.
          Repeat steps 1~6 for the the other folders.
          Note: If you link "My Documents" then "My Music" and "My Pictures" are linked automatically since these folders are in the "My Documents" folder.

  • On Windows 7:
    • Changing the Desktop folder:
      1. Double click on My computer, right click on the "Desktop" folder that is on the left panel->Properties->Shortcut tab.
      2. Change the path in the Target edit box to the new folder ("~\WindowsFolder\Desktop").
      3. Press OK.
      4. Windows will ask if you want to move the existing contents to the new folder. Click "Yes".
      5. Go to the Desktop and press F5.
    • Changing "My Documents" etc.:
      1. Navigate to "C:\Users\"User-Name"
      2. Right click on the "My Documents" folder->Properties->Location tab.
      3. Change the path to "~WindowsFolder\My Documents".
      4. Press OK.
      5. Windows will ask if you want to move the existing contents to the new folder. Click "Yes".
              Repeat the process for the other folders (My Music/Pics, Downloads etc.).
              Note:
      • The path has to be changed in the "Shortcut" or "Location" tab, whichever is available.
      • If you prefer, you can change the location of the Application data folder - "C:\Users\"User-Name"\AppData\Local". For this to be visible have to be able to view hidden files and folders. Refer this link.

Check and repair disk errors

  • Introduction: Disk errors can occur any time, the most common being abnormal termination of programs or the OS especially when the hard drive is being accessed. Most PCs break due to disk errors. Some disk errors can be fixed while some can't. As fate has it, a drive will eventually die someday but you can postpone that day. Checking disks for errors helps the OS partition to stay healthy which means that you will have lesser system crashes.
  • Advantages of performing disk check:
    • As fate has it, a drive will eventually die someday but you can postpone that day.
    • Helps the OS partition to stay healthy which means that you will have lesser system crashes
  • How to check and repair disk errors: 
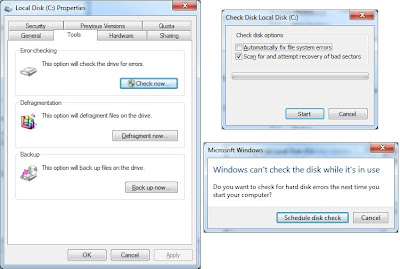
    1. Go to My Computer->Right click on the Drive that you want to check->Properties->Tools tab->Click the "Check now" button under "Error checking".
    2. You will be presented with the "Check disk" dialog with two check boxes:
      • Automatically fix file system errors: Validates data and fixes file system errors (inodes, orphaned file entries etc.). A reboot may be required for the operation to proceed.
      • Scan for and attempt recovery of bad sectors : This operation might take some time depending on the data that you have on the drive.
Note:
  • If the OS is using the partition to be checked, you can schedule a disk check at the next reboot (A blue screen pops up after reboot).
  • If the partition is not being used by the OS, the check will be performed in the background.

Defragment your drive

  • Introduction: Although files appear one after the other in the file explorer, they are not necessarily stored contiguously on the hard drive. As all files are not of the same size, files are broken into bits and shoved in any free space available.
  • What is fragmentation: Consider the case when you delete a file - An empty space is created. To make this space usable any new file to be stored may be broken down to make a part of it to fit in this space. The file is now said to be fragmented, meaning that it is now stored in chunks.
  • What causes disk fragmentation: Imagine if you were to repeat the process of deleting and creating files. Your disk might end up with a lot of fragmented files.
  • Problems with a fragmented drive: Fragmentation may not seem like a problem at first glance since the OS is designed to handle this cleverly. But over time you will realize that the system needs more time to retrieve data from a fragmented drive. It's like storing your things in different rooms. If you were to move out, then you will have to go to each room, retrieve your things and put them in your baggage. Instead if you had all your belongings in one room it would save you the trips to the other rooms. Similarly if your hard drive is heavily fragmented your hard drive head needs to make more number of trips to access data.
  • Knowing if your drive is fragmented: Your drive is probably fragmented if:
    • You often hear a lot of churning while accessing files.
    • Accessing files takes unusually long.
  • The solution:
    1. Go to My Computer-> Right click on any Drive->Properties->Tools tab->Click on Defragment now.
    2. This will open the Disk defragmentor. Select the drive that you want to defrag and defrag it.
       After the process is completed you will feel the difference. You PC will be fast and also quiet. I bet you will miss the churning sound though... :-)

Note:
  • You can select any drive in the Disk defragmentor.
  • Defragment all drives if possible.

Clean up junk files

The dialogs may be different on your PC
  • The problem: Windows fails to clean temporary files leading to huge unwanted files getting built up. These files eventually become junk files which serve no purpose and if left unattended can eat up quite a lot of space.
  • The solution: Follow these steps:
    1. Go to My Computer->Right click on the Drive that you want to clean->Properties->General tab->Click on Disk Cleanup.
    2. Wait patiently while Windows finds the files and makes some computations.
    3. After a while the "Disk cleanup" dialog will show up, make sure that you check to delete all the files in the list.
    4. Press OK.
        That wasn't difficult now, was it? Although the process may take a long time you can continue to use the system normally.

Note:
  • As part of the cleaning process Windows compresses files that are seldom used. For files which are not accessed in ages it's not a bad idea and might free up considerable amount of space on your system. 
  • The OS partition needs cleaning at all times. The other drives can be skipped.

Wednesday, May 25, 2011

File explorer options

  • Just a thought: The file explorer is quite cool in itself. Every OS should have one without which browsing through files could be a real pain. The windows file explorer has many options under the "Folder options" dialog that probably most of us never bothered to see nor customize.
    • How to open "Folder options": In the file explorer do any one of these:
      • Press ATL + t and then o
      • Select Tools->"Folder options" from the menu.
    • Some interesting options that fall under the "View" tab are:
      1. Display full path in the address/title bar:
        • Use: To know where you are
        • Recommendation: Check
        1. Show hidden files, folders and ... :
          • Use: Displays hidden files and folders
            • Recommendation: Select
              • Details: Some OS and application files are hidden by default. The aim is to prevent accidental data modification by the user. If you enable this, folders and files that you probably never saw will be displayed. It might take a while to get used to this, but it's worth it as you will know about all the hidden files that exist on the system. :-)
              1.  Hide extensions for known file types:
                • Use: Hides the file extension, displays only names
                  • Recommendation: Uncheck
                    • Details: If this is checked and you try to change the extension, the file name is changed and the extension remains the same - Not what you want. If you uncheck it all extensions are visible and changeable.
                    1.  Hide protected OS files:
                      • Use: Hides important OS files
                        • Recommendation: Uncheck
                          • Details: It is better to leave it checked unless you really want all system files to be displayed. Accidental modification/deletion of these files may render the OS corrupt and unbootable.
                          1.  The "Apply to folders" button:
                            • Use: The current layout is preserved for all file explorer windows opened henceforth.
                              • Details: If you like the layout of the current file explorer window(detailed/icon/tiles/list etc.) and want all future explorer windows to be like this one, click this button. Now you don't have to change the layout for each window you open.

                            Tuesday, May 24, 2011

                            5 tips to improve boot up speed

                            • Change Boot order under BIOS: Basic Input Output System (BIOS) is the first program that is loaded on boot.
                              1. Determine which key you have to press to enter BIOS (The key to be pressed is displayed when the system boots up at the corner on the screen - something like "Press F2 to enter Setup". In some systems it is the "DEL" key)
                              2. Reboot again and keep pressing the key until you enter BIOS setup (The blue screen with menus)
                              3. Search for the menu which reads "Boot order" and select it.
                              4. Change the boot order - Move "Hard drive" to the top.
                              5. Save the configuration and exit.
                                      Note:  If you want to boot from CD or other devices, you will have to change the boot order again.
                            • Tune the OS startup list: You can do this by using the "msconfig" utility.
                            • Defragment the OS partition: If the OS partition is fragmented the drive needs to be accessed more number of times to retrieve the files needed for booting. To perform defrag:
                              1. Go to My Computer->Right click on any drive->Properties->Tools tab->Click on Defragment now.
                              2.  This will open the Disk defragmentor. Select the OS partition and defrag it.
                            • Check and repair disk errors: More disk errors means more number of invalid disk accesses. Try fixing disk errors:
                              1. Go to My Computer->Right click on the OS partition->Properties->Tools tab->Click the "Check now" button under "Error checking".
                              2. You will be presented with the "Check disk" dialog with two check boxes.
                              3. Choose the appropriate option and press the "Start" button.

                              Monday, May 23, 2011

                              Hibernate - An alternative to shutdown

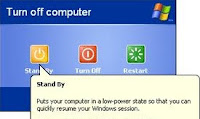
                              Windows XP - Press SHIFT key to change "Stand By" to "Hibernate"
                              Windows 7
                              • What is Hibernate:
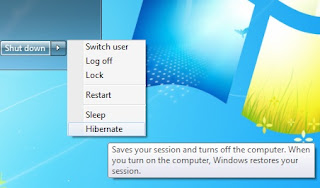
                                • The contents of RAM and the entire system state are written to a file (Hibernate.sys).
                                  • The system is turned off (no power consumption).
                                    • It is perfectly safe to disconnect the power source.  
                                    • Advantages:
                                      • Resume is faster than normal power on/boot process.
                                      • The system state is restored on resume - looks just the way you left it.
                                      • Saves power - no power consumption.
                                      • The power source can be disconnected. 
                                    • Disadvantages:
                                      • Requires additional space on the hard drive (The size of Hibernate.sys is almost the same as the amount of RAM).
                                      • The process of hibernate/resume might be slow on some systems.
                                      • Some devices may not work after resume (problem with the device driver).
                                      • Windows may not be able to hibernate on some systems (problem with some device).
                                    • Configuring Windows XP:
                                      1. Go to Desktop->Right click->Properties.
                                      2. Go to the "Screen saver" tab->Press the "Power" button under "Monitor power".
                                      3. Go to the "Hibernate" tab and enable hibernation.
                                      4. Press OK/Apply.
                                    • Configuring Windows 7:
                                      1. Go to "Start"->type "Power options" in the search box->Enter.
                                      2. Click on "Change plan settings" for the current plan.
                                      3. Click  "Change advanced power settings".
                                      4. Navigate to "Sleep"->"Allow hybrid sleep"->set it to "Off".
                                      5. Press OK.
                                    • How to hibernate: Any one of the following:
                                      • Press the "Hibernate" key combination on your keyboard.
                                      • Select "Hibernate" option from the shutdown menu (You can also Press "h" when in the shutdown menu)
                                      • Configure Power options.
                                    Note: Under Windows XP, if the hibernate option is not displayed in the shutdown menu, hold down the SHIFT key.

                                    • How to resume: Press the power button.
                                    • When to use: Anytime (For short durations, I would use sleep/standby).
                                    • When not to use: If your system is not stable after you first tried it.
                                    Note:
                                    • The power source can be completely disconnected.
                                    • Windows 7 has a feature called "Hybrid sleep" which is a combination of sleep and hibernate.

                                      Sleep/Standby - An alternative to shutdown

                                      Windows XP
                                      Windows 7
                                      • What is sleep/standby:
                                        • The system is in low power state (processor and RAM are in low clock mode).
                                        • Most peripheral devices are turned off.
                                        • Power consumption of the entire system is negligible, but not 0.
                                        • All data is lost if the power source is disconnected.
                                      • Advantages:
                                        • Fast - Standby and resume are really quick < 2 secs.
                                        • The system state is preserved on resume - looks just the way you left it.
                                        • Saves power - very little power consumption.
                                      • Disadvantages:
                                        • System still consumes little power.
                                        • All data is lost if the power source is disconnected.
                                      • How to standby: Any one of the following:
                                        • Press the "Sleep" key on your keyboard.
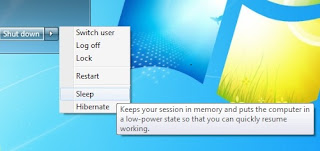
                                        • Select "Sleep/Standby" option from the shutdown menu. (You can also Press "s" when in the shutdown menu)
                                        • Configure Power options.
                                      • How to resume: Depending on your system:
                                        • Press any key.
                                        • Press the wake-up key.
                                        • Press the power button lightly.
                                      • When to use: When you go on a short break..
                                      • When not to use:
                                        • When you go on a long break ( > 30 minutes). It's better to hibernate.
                                        • If there are chances of a power failure.
                                      Note:
                                      • Take care not to disconnect the power source. A laptop's batter will drain at a lower rate. 
                                      • Windows 7 has a feature called "Hybrid sleep" which is a combination of sleep and hibernate.

                                        Saturday, May 21, 2011

                                        OSK - The emergency keyboard

                                        On-Screen Keyboard - Windows XP Japanese

                                        On-Screen Keyboard - Windows 7 Japanese
                                        • What is OSK: On-Screen Keyboard (OSK) is a software keyboard available on Windows. It works well when your keyboard doesn't work.
                                        • Launching "osk": 
                                          •  If your keyboard works:
                                            1. Lunch the "run" dialog (Windows key + r).
                                            2. Type "osk" and press Enter.
                                          •  If your keyboard is dead:
                                            1. Navigate to the Windows folder ("C:\Windows" by default).
                                            2. Go to the "system32" folder.
                                            3. Find and double click on "osk.exe".
                                        • How to use it: Use the mouse to click on the keys. Give it a shot and you'll understand.

                                        Friday, May 20, 2011

                                        Handy keyboard shortcuts

                                        Windows key:
                                        • Windows + e - Open file explorer
                                        • Windows + d - Show desktop or restore all windows
                                        • Windows + r - Open "run" window
                                        • Windows + f - Open search
                                        Tab key:
                                        • Tab - Move focus to the next item
                                        • SHIFT + Tab - Move focus to the previous item
                                        • CTRL + Tab - Switch between tabs
                                        • ALT + Tab - Switch between windows
                                        CTRL key:
                                        • CTRL + c - Copy
                                        • CTRL + x - Cut
                                        • CTRL + v - Paste
                                        • CTRL + z - Undo
                                        • CTRL + b - Enable/disable Bold font
                                        • CTRL + u - Enable/remove Underline
                                        • CTRL + i - Enable/remove Italic
                                        • CTRL + F4 - Close current tab
                                        • CTRL + t - New browser Tab (works only within the browser)
                                        • CTRL + n - New browser wiNdow (works only within the browser)
                                        Function keys:
                                        • F1 - Help
                                        • F2 - Rename file
                                        • F3 - Search text forward
                                        • SHIFT + F3 - Search text backward
                                        • ALT + F4 - Close window
                                        • F5 - Refresh
                                        Deleting:
                                        • Del - Move item to Recycle bin
                                        • SHIFT + Del - Delete item forever (don't move to Recycle bin)
                                        Others:
                                        • Open task manager: CTRL + SHIFT + ESC
                                        • Display "Open with...": SHIFT + Right click
                                        • Open properties: ALT + Enter
                                        • Display browser history: CTRL + h (works only within the browser)
                                        • Space bar (on dialogs) - Execute the current button action, toggle check boxes.
                                        Menu manipulation:
                                        • Create a New folder - ALT + f , w, f  (in the explorer window)
                                        • Save file - ALT + f, s  (sometimes - CTRL + s)
                                        • Save file as - ALT + f, a
                                        • Find text - CTRL + f
                                        • Replace text - CTRL + h (sometimes - CTRL +  r)
                                        • Close - ALT + f, x

                                        You can find the complete list here:
                                        http://support.microsoft.com/kb/126449

                                        Note: In any software press the ALT key to use menu shortcuts - The shortcut keys have an underscore.

                                        Thursday, May 19, 2011

                                        "Run" - Quickly launch any program or open a file

                                        • Advantages: Fast, easy, eliminates the need to navigate to a program/file.
                                        • Launching "run":
                                          • The quick way - Windows key + r (Press "r" while holding down the "Windows key")
                                          • The slow way - Windows 2000/XP: Start->run. Windows 7: Start->Type "run" in the search box->Enter.
                                        • Launch any program or open any file using "run":
                                          1. Create a shortcut to the program/file you want to launch/open. (You can do it by the "Create shortcut/Paste shortcut" in the context menu. If a dialog pops up saying - "Windows can't create it here..blah blah..create on the desktop instead?", select "yes". Our aim is just to obtain a shortcut to the program and you can do it in a variety of ways.)
                                          2. Cut the shortcut link and paste it into the Windows folder. ("C:\Windows" by default) (You will have to confirm the operation in Windows 7.)
                                          3. Rename the link to whatever you want - This is the name you will type in the run dialog. So, choose it wisely - preferably an easy to remember or a short one.
                                                   Done..Now type the name in the run dialog and press Enter. Pretty cool hun?...

                                        • Commands/programs that work by default:
                                          • notepad - Open Notepad
                                          • wordpad - Open Wordpad (not Microsoft Word)
                                          • mspaint - Microsoft Paint
                                          • calc - Calculator
                                          • devmgmt.msc - Open Device manager
                                          • msconfig - System configure utility
                                          • regedit - Registry editor
                                          • cmd - Launch the command window
                                          • services.msc - Launch Service manager
                                          • control.exe - Launch the Control panel
                                          • Browsing PCs on the network by using the IP address(\\192.168.0.1) or the computer name (\\my-pc)
                                          • Web URLs
                                                    You don't need any special software for this, everything's right there.

                                        Note:
                                        • You can create a shortcut to anything - folders, batch files...use your imagination... 
                                        • Any file in the "Windows" folder can be launched this way.

                                        Wednesday, May 18, 2011

                                        "msconfig" - Manage startup programs list

                                        • Advantages: Improves bootup time, frees RAM.
                                        • Launching "msconfig":
                                          1. Lunch the "run" dialog (Windows key + r).
                                          2. Type "msconfig" and press Enter.
                                        • Manage the startup programs list:
                                          1. Navigate to the "Startup" tab - This lists the programs that run on startup.
                                          2. Uncheck any program that has been bothering you. A word of  caution - If you don't know about the program leave it untouched. Some programs are required for normal operation (Display/Audio config etc.).
                                          3. Press the OK button - A dialog asking if you would like to restart the system will be displayed.
                                                 After the system restarts, another dialog will be displayed indicating that you have made changes to the configuration and asks you if you would like to undo those changes and so on. It's the Windows way of letting you know that you are still it's master....

                                        • What I do: As a rule of thumb, I uncheck all program updaters. I think they are just a waste of time and resources. I prefer to manually update all software, the simplest reason being to avoid confusion and surprises. If you want to update a software I am pretty sure that you will find "Check for updates" under the "About" menu or in under "Settings" in that software. How difficult is it to click on that, eh?
                                                 Some software specify the autostart option during their setup process, but never the less I have made it a routine to use msconfig and make sure that no software has added itself to the startup list.


                                        Note: You can customize other items in the msconfig dialog, but if you have no knowledge of what you are doing I would suggest not to play around too much.

                                        3 tips to improve your computer/hard drive's health

                                        • Introduction: After a while your PC which is fast and responsive might become sluggish. While this may seem normal, we all want to get it back on track. While reinstalling the OS will no doubt solve the problem, why reinstall when there are easy ways? From my experience any PC can be fixed provided you have the time and patience.
                                        • The 3 tips:
                                          1. Clean up junk files: Refer this link.
                                          2. De-fragment your drives: Defragmenting your drives regularly will improve your hard drive's health and make you PC faster. Refer this link.
                                          3. Check and repair Disk errors: Refer this link.
                                        • What I do: I usually remove temp files once a week, defrag once in 15 days and do a complete disk error check once a month.
                                        • When to do: It depends on how much you use the PC and you will know when your PC needs tuning by experience. If your PC is taking awfully long to retrieve files/open documents and is busy churning have no doubt that the disk needs to be defragmented. If your PC shuts down randomly or freezes, a bad sector could be the problem. So check for errors and give it a shot. Who knows these simple steps might just save you a few bucks!!